
I don’t get to test many clip-ons, but I enjoy it when I do, especially when the device in question is as good as Pixfra’s Taurus T650 LRF. It’s rugged, well-finished, nicely designed, and has intuitive controls, but what really makes it interesting and innovative is its combination of integrated laser rangefinding and ballistic compensation. Consequently, this review will focus on operation rather than physical characteristics, because that’s where the Taurus stands out, delivering exceptionally practical performance in a package you can swap between rifles.
How Does a Ballistic Clip-On Compare to Traditional Setups?
Until now, integrating laser rangefinding with ballistic compensation has been the preserve of dedicated thermal scopes, which, barring the use of a suite of inter-compatible, high-quality, zero-retaining mounts, effectively tie you to one rifle. The beauty of clip-ons, in general, is that they can turn any day scope into a thermal in seconds. For example, my own Pulsar Krypton (a.k.a. “Old Faithful”) does solid duty on everything from a sub-12ft/lb air rifle for rats all the way up to a deer rifle for woodland stalking. When I need thermal, I’ve got it; when I don’t, I enjoy all the advantages of glass optics, including a pin-sharp image, reliable mechanical adjustments, and no battery icon hovering in the corner of my view. My Krypton can’t do ballistics, though. For that, I’ve relied either on a programmable hand-held rangefinder or on a basic rifle-mounted unit backed up by old-school holdover stickers on my elevation turret or inside my lens cover. Both systems get the job done and can even feel satisfyingly low-tech, until something like the Taurus LRF comes along, which does it all in one hit.
How Do You Set Up Ballistic Profiles?
The Taurus pairs via Wi-Fi with Pixfra’s Outdoor app, which offers a live stream from the device, remote configuration, and the ability to create profiles for different rifles and loads. For the latter, you’ll need to enter scope height-over-bore, projectile weight, BC, muzzle velocity, and zeroing data, such as range and atmospheric conditions. Here, as ever, accuracy matters, as the quality of your inputs directly affects the precision of the firing solutions. If you prefer, you can enter the ballistic parameters directly into the Taurus itself, but the app makes it faster and easier to keep multiple profiles organised.
Zeroing works in the familiar digital/thermal scope fashion: fire a shot, zoom in, freeze the frame with the crosshairs on your point of aim, move a secondary cross to the point of impact, save, then confirm and fine-tune with further shots. The Taurus even displays the click value for each adjustment, perfect for dialling in small corrections. This is worth doing because the system permits sub-0.1 MRAD precision. It’s the first clip-on I’ve tested that offers more than calibration. It’s often said that clip-ons don’t need zeroing or calibrating, but I consider it an essential performance optimiser. Better yet, with the Taurus, each profile can be individually zeroed, so selecting the appropriate profile gives you tuned electro-optical precision, as well as a ballistic data set tailored to your rifle and load.
How Does the Ballistic Holdover Work in Practice?
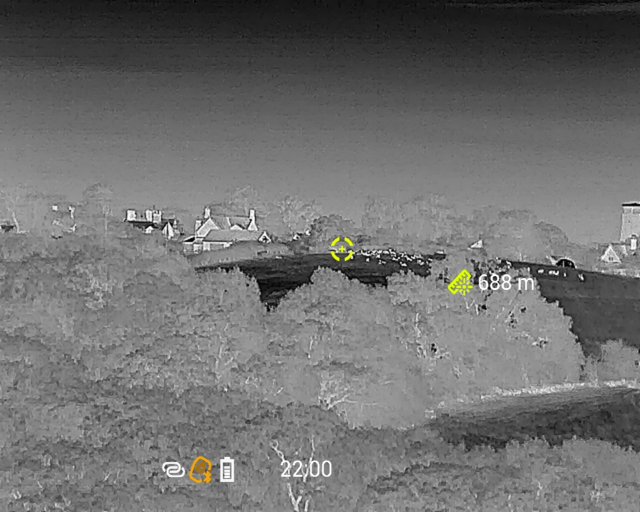
In the field, ranging a target generates holdover data in the top-right quadrant of the display, above a windage value. The lasered range interacts with the data in the active ballistic profile to generate both values. I found configuring my profiles with a wind value of 10 km/h at 90 degrees and guesstimating the offset applied to each shot based on the prevailing weather conditions worked well. Offsets are shown in centimetres or inches, which is usable, but I would prefer MOA or MRADs. What’s lacking is a secondary aiming point (SAP) that shows you exactly where to aim. Unlike a dedicated digital or thermal sight, where the reticle and zoom belong to the same electronic system, the Taurus doesn’t “know” what reticle you’re using or what magnification it’s set to, and so cannot know where to generate an SAP. Consequently, you have to apply the correction shown in the display manually by dialling in or adjusting your point of aim, resulting in a slightly longer engagement time than with a dedicated rangefinder-equipped electronic sight. That said, it’s still a fair bit slicker than combining hand-held or rifle-mounted ranging with stick-on drop guides, especially at night.
Can You Use the Thermal Clip-On During the Day?
Thermal isn’t just for night work, of course. In daylight, it’s invaluable for spotting quarry in deep shadow or dense cover, such as feral pigeons in the rafters of a cowshed, rats in brambles, squirrels high in the trees, and deer in thick woodland. With practice, you learn to read the intensity of a heat signature to judge when you’ve got a clear shot. Even so, the usual rule applies: never touch the trigger without 100% confidence in your ID and backstop.
How Do You Mount the Taurus to a Day Scope?
Mounting the Taurus was straightforward. The distributor, Thomas Jacks, asked for the outer diameter of the scope I’d be using, then supplied an adapter to match. This slipped over the objective bell and locked with a fore-and-aft cam lever. The Taurus screws into the front of the adapter via a male thread, and once you’ve found the best view through your day scope, you lock it in place with a threaded ring, using the supplied flat spanner.
The adapter stayed perfectly aligned throughout testing, but it’s not as flexible as the Pulsar design, which includes bushings for different objective bell diameters, so you’ll need a dedicated adapter for each scope. Additionally, if you opt to dedicate Pulsar adapters to different scopes, their current model features a bayonet mount for rapid swapping. The Taurus has a similar feature, but it’s a different size from Pulsar’s, and currently serves only to mount a monocular eyepiece (available from Pixfra or Rusan). Nevertheless, it raises the possibility of a full QD system in the future. Overall, the information on Pixfra adapters for the Taurus is sketchy at present, so it is worth looking to Rusan and Smartclip for immediate solutions.
What is the Optimal Magnification for a Clip-On?
With the right adapter, you can mount a clip-on to almost any scope, but magnification is a key factor in compatibility. On a zoom scope, 2.5-3x is ideal, as it shows the maximum display area without intrusive pixelation. Zooming in narrows the field of view and makes individual pixels more noticeable. With my Krypton, these constraints make zooming in beyond about 7-8x counterproductive. On the same 3-15×50 Minox ZP5, the Taurus stayed usable right up to 15x, with 10x a sweet spot for image smoothness and precision aiming. Beyond 5x, the tightened field of view began to crop out the on-screen information, but this was easily fixed via a menu option that shrinks and centres the readouts.
What Are the Standout Features?
You still have to reach out to operate the focus knob, but a remote puts all the other controls at the fingertips of your supporting hand (left or right!). The Taurus’ Bluetooth remote is particularly good, as both it and the magnetic cradle it snaps into are made from the same light-but-tough magnesium alloy as the Taurus itself, and the unit comes with a roll of double-sided hook-and-loop tape, allowing you to mount it anywhere you like.
The image quality was everything I’ve come to expect from Pixfra’s combination of a 640×512, 12µm thermal sensor, 1920×1080 0.49” OLED display, PIPS 2.0 algorithms, and AAIC technology. The latter employs AI to learn from every frame. It works, and I think this is how. As the device moves or the scene changes, each 50Hz frame captures a slightly different signal. “Dumb” thermals (sorry, Old Faithful!) discard this extra data, but AAIC “remembers” it, combining information from successive frames to build a more detailed image. The effect is similar to having a sensor with more, smaller pixels, only better, because AAIC’s cumulative processing improves not only detail but also accuracy, complementing the precision already provided by the Taurus’ zeroing capability and ballistic profiles.
What Models Are in the Pixfra Taurus LRF Series?
The Taurus LRF series comprises four variants: the T425 LRF, T435 LRF, T635 LRF, and the T650 LRF tested here. The numbers are logical: 4-prefix variants have 384×288 sensors, and successive digits indicate lens size (25, 35, or 50mm). Across the range, weight variation is only 50g, and battery life from the 3,200mAh 18650 cells supplied is seven hours for the 384×288 models, and six hours for the thirstier 640×512 models. Everything else, including the dimensions, is the same, except the price, which is amazing at both ends of the scale, topping out at just £2,649.95 for the T650 LRF and kicking off at a mere £1,299.95 for the T425 LRF.
Conclusion
The T650 LRF I received was an early sample, so I had some feedback to offer on both hardware (adapter options) and firmware (menu layouts). Even so, its performance, pricing, and promise, combined with Pixfra’s build quality, the underlying versatility of clip-on devices, and, in LRF models, the innovative and practical inclusion of integrated laser rangefinding and ballistic compensation, make the Taurus T650 LRF an exciting and highly attractive route into thermal, especially for anyone with an enduring appreciation of high-quality conventional optics.

Technical Specifications
- Models: T425 LRF, T435 LRF, T635 LRF, T650 LRF (tested)
- Sensor (T650): 640×512, 12µm
- Sensor (T4xx): 384×288
- Display: 1920×1080 0.49” OLED
- Lens Sizes: 25mm, 35mm, 50mm
- Battery: 3,200mAh 18650 (rechargeable)
- Battery Life: 6 hours (640×512 models), 7 hours (384×288 models)
- Key Features: Integrated Laser Rangefinder, Ballistic Compensation, AAIC Technology
- Price Range: £1,299.95 (T425 LRF) to £2,649.95 (T650 LRF)
- Distributor: Thomas Jacks – www.pixfraoutdoor.co.uk


